Shopping
Schiene und Führungsschlitten - Link IGUS versorgt euch mich den Teilen den Teilen wie Schiene und Führungsschlitten. Hier müsste ihr nur noch eure gewünscht Länge der Schiene auswählen und den passenden Führungsschlitten dazu. Es ist zu empfehlen eine Schiene zu wählen, die mir hohlen Seitenwänden ausgestattet ist, da diese sich gut zum Verkabeln eignen. Lochplattenwinkel 90 x 90 x 65 x 2,5 - Link 2 x Zahnriemenscheibe 60 Zähne - Link Riemen - Link Kühlrippen - Link Stepper Motor - Link Bei Conrad Electronics bekommt ihr den passenden Stepper Motor, der 1.10Nm Halte-Moment eure Kamera auch eine Schienenwinkel von 45° nach oben zieht, auch wenn eure Kamera um die 5kg wiegt. Das gute bei diesem Motor ist, dass ihr diesen mit einer Betriebsspannung von 12V/DC auch an eine herkömmliche Autobatterie anschließen könnt, wenn es mal raus in freie geht und ihr Mobil sein wollt. Micro Controller - Link Mit dem Arduino Uno steuert erweitert ihr euren Aufbau um das Herzstück des Sliders. Dieser Microcontroller übernimmt die Synchronisation zwischen einem Stepp machen und gleich danach ein Foto schießen. Big Easy Stepper Driver - Link Damit euer Stepper Motor genau die Power und die Ansteuerung bekommt die er benötigt, verwenden wir in diesem Aufbau den Big Easy Stepper Driver, der mit einen Stromstärke von Max. 2A ganz gut den Stepper Motor mit Strom versorgt. Schalter - Link - Link Und hier noch die entsprechenden Schalter für den Geschwindigkeit Regler und Not Stopp. Selbstauslöser - Link Für den Selbstauslöser eurer Kamer benötigt ihr einmal das entsprechende Kabel was zu eurer Kamera passt und außerdem diesen Optokoppler.Bauen
|
Step 1.
Wenn ihr alle Teile zusammen habt dann kann es losgehen. In dem Bilder Tutorial seht ihr wie ihr den Führungsschlitten und die Schiene zusammen fügt und den Riemen einbaut.
Zuerst nehmen wir die Führungsschiene und Bohren uns eine Loch an einem ende des Slider mittig in die Schiene. Durch dieses Loch verbinden wir einer der Zahnräder mit der Führungsschiene.
|
Step 2.
Auf der Gegenüberliegenden Schienen Seite befestigen wir den Stepper Motor mit dem flachgedrückten Baumarktwinkel.
Dazu bohrt ihr wieder mittig ein Loch in die Schiene um den Winkel mit der Schiene zu verbinden. Dabei ist es zu empfehlen, eine Flügelmutter zu verwenden,
da somit schneller der Riemen gespannt werden kann. Mit der anderen Seite des Winkels könnt ihr dann den Stepper Motor verbinden.
|
|
(Abbildung 1)

|
(Abbildung 2)

|
|
Step 3.
In dem Führungsschlitten bohrt ihr mittig ein Gewinde, um den Stativkopf mit der Schlitten zu verbinden.
Danach verbindet ihr den Riemen mit dem Führungsschlitten. Dazu müssen je nach Ausführung in die (Führungsklötze)
Gewinde gebohrt werden für 2 passende Schrauben die ihr bestimmt bei euch noch rumliegen habt.
|
Step 4.
Jetzt könnt ihr den Führungsschlitten in die Schiene einsetzten.
|
|
(Abbildung 3)

|
(Abbildung 4)

|
Schaltung
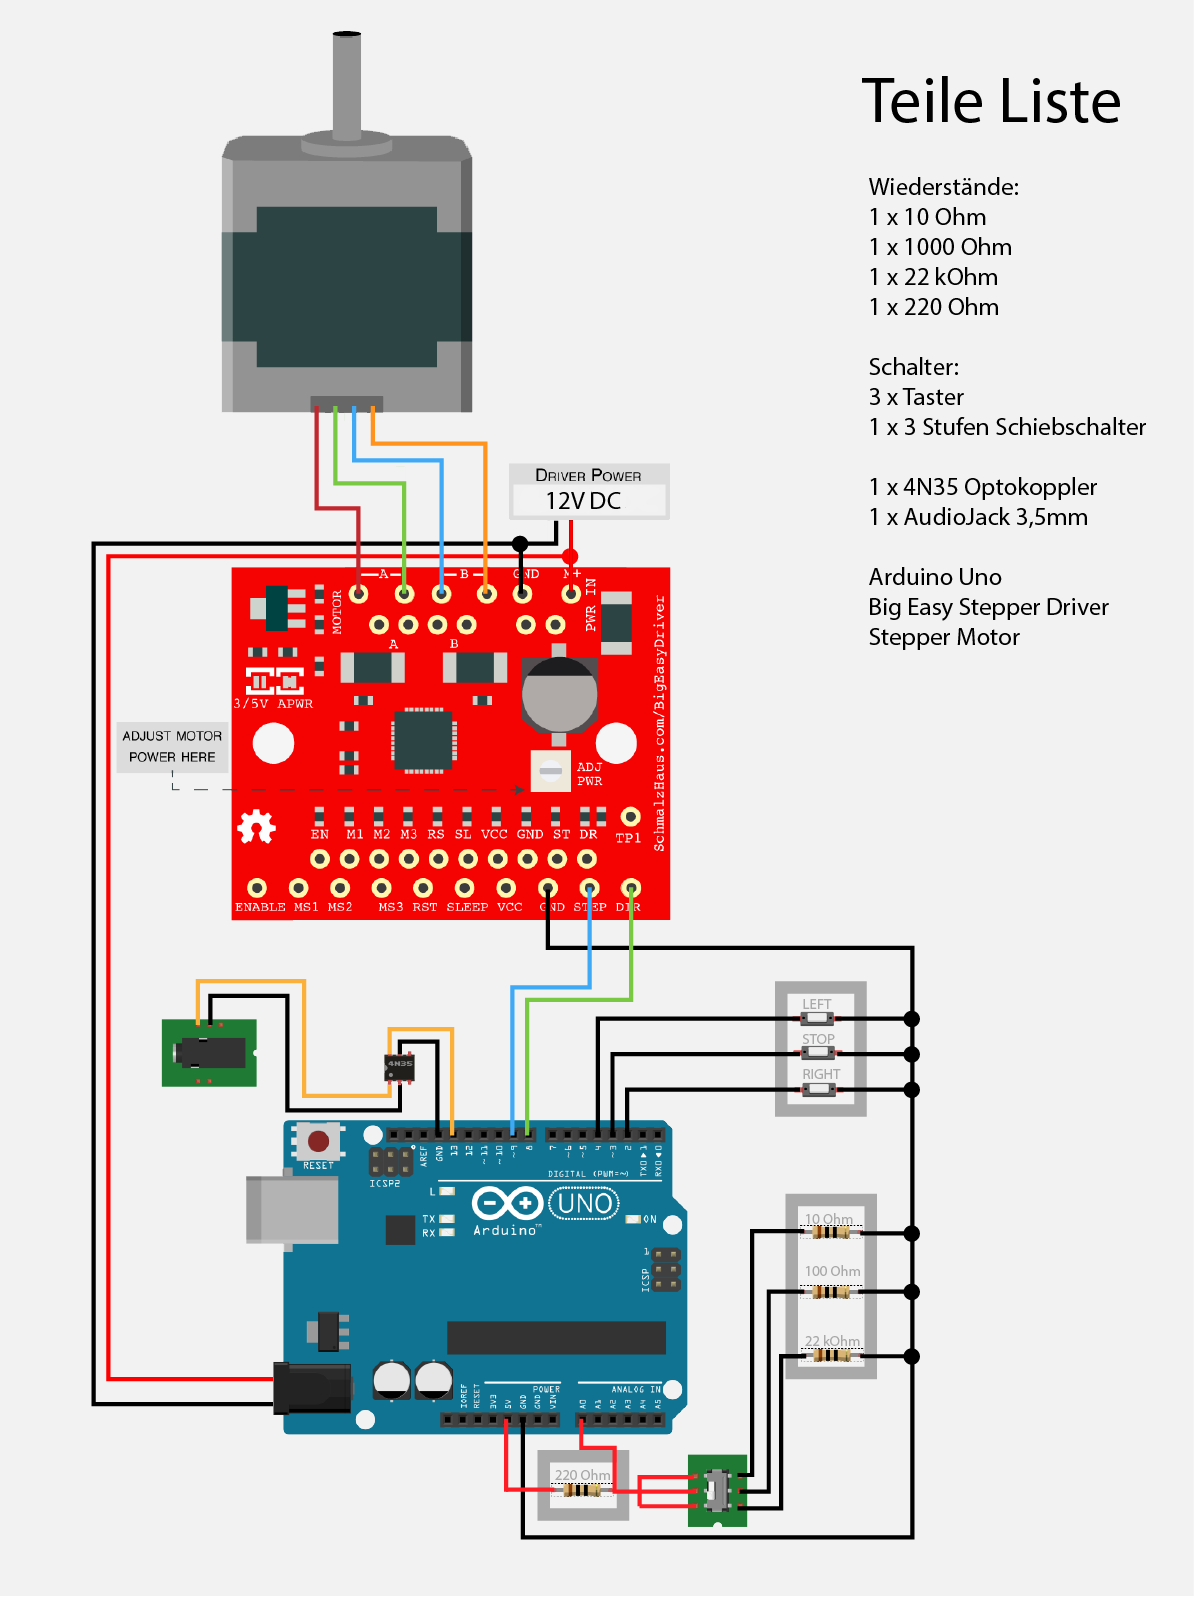
Hier könnt ihr sehen, wie ihr euer Arduino mit dem Big Easy Stepper Driver und dem Stepper Motor verbindet. Abbildung 6 und 7 zeigen euch wie ihr die gesamte Elektronik in einer Box unterbringen könnt und auch gleich die Schalter für Not Stop und Geschwindigkeit angebracht werden können. Jedoch möchte ich in diesem Tutotial nicht weiter darauf eingehen wie gebaut wurde, sondern nur zeigen was für eine Umsetzungsmöglichkeit gesteht. Mit den Wiederständen 10 Ohm, 100 und 22kOhm könnt ihr die 3 Stuffen der Geschwindigkeit des Slider bestimmen, wobei gilt je größer der Wiederstand, desto langsamer der Slider. Der 3,5mm AudioJack Ausgang verbindet ihr mit dem Selbstauslöserkabel eurer Kamera. Achtet darauf das dieses Kabel lang genug ist. (Abbildung 5)
|
(Abbildung 6)

|
(Abbildung 7)

|